
Kubernetes has revolutionised the way we deploy, scale, and manage containerised applications. Yet, managing complex Kubernetes applications can be daunting. This is where Helm comes in—a powerful package manager that simplifies the deployment of applications on Kubernetes clusters. In this blog post, we’ll dive deep into Helm charts, explain their significance, and provide a detailed step-by-step guide on provisioning an application to Azure Kubernetes Service (AKS). We’ll also touch on how automation can further streamline this process using Azure DevOps, which we will cover in another post.
What is Helm and Why Use It?
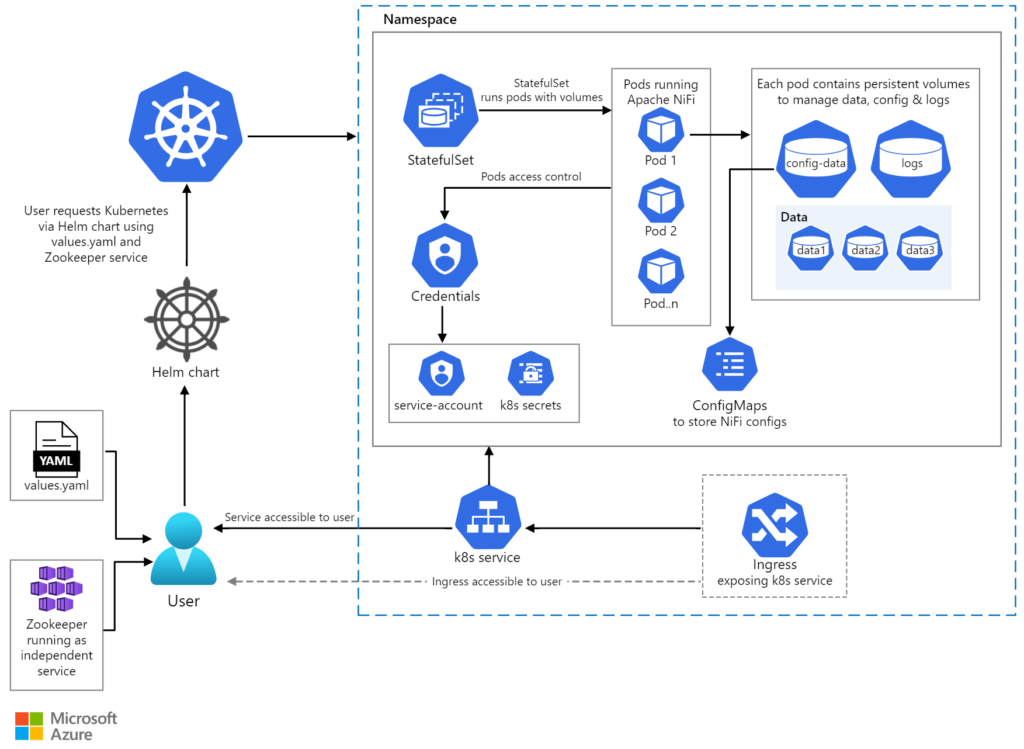
Helm is often described as the “Kubernetes package manager.” It enables users to define, install, and upgrade even the most complex Kubernetes applications. Helm uses a packaging format called charts, which are collections of files that describe a related set of Kubernetes resources.
Key Benefits of Using Helm:
- Simplified Deployment: Helm charts package all the necessary Kubernetes resources, making it easier to deploy complex applications.
- Version Control: Helm supports versioning, enabling you to manage and roll back application updates seamlessly.
- Reusability: Charts can be shared and reused across different environments, promoting consistency and reducing duplication of effort.
- Configurability: Helm allows parameterisation of configurations, enabling custom deployments without modifying the core chart.
Understanding Helm Charts
A Helm chart is essentially a bundle of YAML files that describe a set of Kubernetes resources. Here’s a quick overview of the main components of a Helm chart:
- Chart.yaml: Contains metadata about the chart.
- values.yaml: Defines default values for the chart’s parameters.
- templates/: Contains Kubernetes manifest templates that are rendered using the values provided in values.yaml or directly via Helm commands.
- charts/: A directory for dependent charts.
Provisioning an Application to Azure AKS Using Helm
Let’s go through the process of provisioning an application to Azure Kubernetes Service (AKS) using Helm, step by step.
Step 1: Set Up Azure AKS Cluster
Before we start with Helm, we need an AKS cluster. Use the following Azure CLI commands to create a resource group and an AKS cluster.
# Log in to your Azure account
az login

# Create a resource group
az group create --name myResourceGroup --location eastus

# Create an AKS cluster
az aks create --resource-group myResourceGroup --name myAKSCluster --node-count 1 --enable-addons monitoring --generate-ssh-keys
Step 2: Install Helm
Ensure Helm is installed on your local machine. You can install Helm using the following commands:
# Download Helm
curl https://raw.githubusercontent.com/helm/helm/main/scripts/get-helm-3 | bash

# Verify Helm installation
helm version
Step 3: Connect to Your AKS Cluster
Retrieve the credentials for your AKS cluster and configure kubectl to use them.
# Get AKS credentials
az aks get-credentials --resource-group myResourceGroup --name myAKSCluster

# Verify the connection
kubectl get nodes
Step 4: Create a Helm Chart
Create a new Helm chart for your application. This example will create a simple Helm chart for an NGINX deployment.
# Create a new Helm chart
helm create my-nginx-chart

# Navigate to the chart directory
cd my-nginx-chart
Edit the values.yaml file to configure your NGINX deployment:
# values.yaml

replicaCount: 2

image:
  repository: nginx
  pullPolicy: IfNotPresent
  tag: "1.17.1"

service:
  type: LoadBalancer
  port: 80

ingress:
  enabled: false

resources: {}
Step 5: Deploy the Helm Chart
Deploy your Helm chart to the AKS cluster.
# Deploy the Helm chart
helm install my-nginx-release ./my-nginx-chart

# Verify the deployment
kubectl get all
Step 6: Access the Application
Once deployed, access your application via the external IP provided by the LoadBalancer service.
# Get the external IP of the NGINX service
kubectl get svc --namespace default -w my-nginx-release
Navigate to the external IP address in your web browser to see the NGINX welcome page.
Step 7: Update and Rollback the Helm Release
Helm makes it easy to update and rollback releases. Let’s update the replica count and see how Helm handles it.
Edit the values.yaml file to change the replica count:
# values.yaml

replicaCount: 3
Upgrade the Helm release:
# Upgrade the Helm release
helm upgrade my-nginx-release ./my-nginx-chart

# Verify the updated deployment
kubectl get deployment my-nginx-release -o yaml
To rollback to the previous release:
# Rollback the Helm release
helm rollback my-nginx-release 1

# Verify the rollback
kubectl get deployment my-nginx-release -o yaml
Automating Helm Deployments with Azure DevOps
Automation can significantly streamline your CI/CD pipeline. Azure DevOps provides robust support for automating Helm deployments. In an upcoming blog post, we’ll explore how to automate this process using Azure DevOps, enabling continuous integration and delivery for your Kubernetes applications.
Helm charts simplify the management of Kubernetes applications by packaging all necessary resources into reusable and configurable units. By leveraging Helm with Azure AKS, you can streamline your deployment process, maintain consistency, and easily manage updates and rollbacks. As we’ve seen, setting up and deploying Helm charts is straightforward, and automation through Azure DevOps can further enhance your CI/CD pipeline, ensuring smooth and efficient deployments.
Stay tuned for our next post, where we’ll dive into automating Helm deployments with Azure DevOps, providing you with the tools and knowledge to take your Kubernetes deployments to the next level.

