
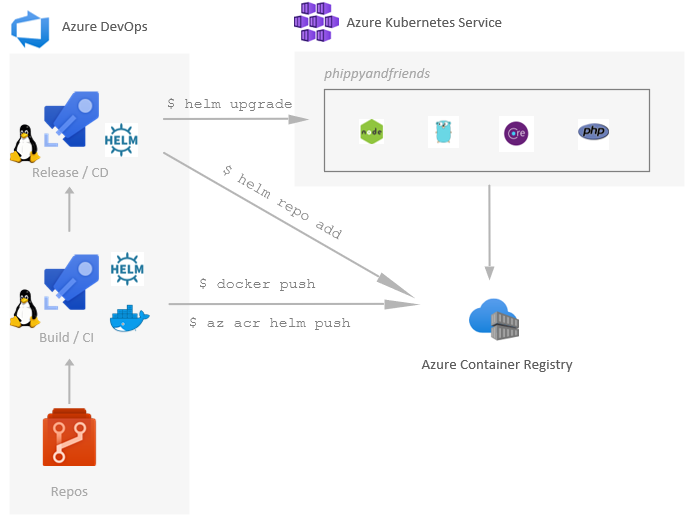
In the ever-evolving world of cloud computing, seamless deployment and management of applications have become crucial. Enter Azure DevOps—a robust suite of development tools by Microsoft that provides end-to-end DevOps capabilities for building, testing, and deploying applications. Today, we embark on a journey to explore how Azure DevOps can streamline the provisioning of a Helm application to Azure Kubernetes Service (AKS). We’ll guide you through this process step-by-step, complete with code examples, ensuring you’re equipped to harness the power of these tools.
Setting Sail with Azure DevOps
Azure DevOps encompasses a range of services, including Azure Repos, Azure Pipelines, Azure Boards, Azure Artifacts, and Azure Test Plans. For our journey, we will focus on Azure Pipelines, which enable continuous integration and continuous deployment (CI/CD). These pipelines are essential for automating the deployment of applications, ensuring consistency, and reducing manual errors.
Key Benefits of Azure DevOps:
- Automation: Automate your build, test, and deployment processes, allowing you to focus on innovation.
- Collaboration: Foster collaboration among development teams with integrated tools.
- Scalability: Scale your processes seamlessly, regardless of the size of your projects.
- Flexibility: Integrate with a variety of tools and services, providing a versatile DevOps environment.
Charting the Course: Provisioning a Helm Application to Azure AKS
Let’s embark on a detailed voyage to provision a Helm application to Azure AKS using Azure DevOps pipelines.
Step 1: Setting Up Your Azure AKS Cluster
Before diving into Azure DevOps, we need to set up an AKS cluster.
# Log in to your Azure account
az login

# Create a resource group
az group create --name myResourceGroup --location eastus

# Create an AKS cluster
az aks create --resource-group myResourceGroup --name myAKSCluster --node-count 1 --enable-addons monitoring --generate-ssh-keys
Step 2: Preparing Your Helm Chart
Create a Helm chart for your application. For this example, we’ll use an NGINX deployment.
# Create a new Helm chart
helm create my-nginx-chart

# Navigate to the chart directory
cd my-nginx-chart

# Update the values.yaml file for your deployment needs
Here’s a basic values.yaml configuration for an NGINX deployment:
replicaCount: 2

image:
  repository: nginx
  pullPolicy: IfNotPresent
  tag: "1.17.1"

service:
  type: LoadBalancer
  port: 80

ingress:
  enabled: false

resources: {}
Step 3: Setting Up Azure DevOps
- Create an Azure DevOps Project: Navigate to Azure DevOps and create a new project.
- Set Up Azure Repos: Push your Helm chart to Azure Repos.
# Initialize a new Git repository
git init

# Add your files and commit
git add .
git commit -m "Initial commit of Helm chart"

# Add your Azure Repo as a remote and push
git remote add origin https://dev.azure.com/your-organization/your-project/_git/your-repo
git push -u origin master
Step 4: Creating a Service Connection
To allow Azure DevOps to interact with your Azure resources, create a service connection.
- Navigate to your project settings in Azure DevOps.
- Under Pipelines, select Service Connections.
- Create a new service connection for Azure Resource Manager and authenticate it with your Azure account.
Step 5: Defining Your Azure DevOps Pipeline
Create a pipeline file (azure-pipelines.yml) in your repository to define the CI/CD process.
# azure-pipelines.yml

trigger:
- master

pool:
  vmImage: 'ubuntu-latest'

variables:
  azureSubscription: 'your-service-connection-name'
  resourceGroup: 'myResourceGroup'
  aksCluster: 'myAKSCluster'
  namespace: 'default'
  chartPath: 'my-nginx-chart'
  releaseName: 'nginx-release'

stages:
- stage: Build
  jobs:
  - job: Build
    steps:
    - task: UsePythonVersion@0
      inputs:
        versionSpec: '3.x'
    - script: |
        echo "##vso[task.setvariable variable=HelmVersion]$(helm version --short --client | cut -d'.' -f1,2)"
      displayName: 'Set Helm version variable'
    - task: HelmInstaller@0
      inputs:
        helmVersionToInstall: $(HelmVersion)

- stage: Deploy
  dependsOn: Build
  jobs:
  - deployment: Deploy
    environment: 'Azure AKS'
    strategy:
      runOnce:
        deploy:
          steps:
          - task: AzureCLI@2
            inputs:
              azureSubscription: $(azureSubscription)
              scriptType: bash
              scriptLocation: inlineScript
              inlineScript: |
                az aks get-credentials --resource-group $(resourceGroup) --name $(aksCluster)
                helm upgrade --install $(releaseName) $(chartPath) --namespace $(namespace)
              addSpnToEnvironment: true
Step 6: Running Your Pipeline
Commit and push the azure-pipelines.yml file to your repository. This will trigger the pipeline.
# Add and commit the pipeline file
git add azure-pipelines.yml
git commit -m "Add Azure DevOps pipeline for Helm deployment"
git push
Step 7: Monitoring the Deployment
Navigate to the Pipelines section in Azure DevOps to monitor the build and deployment process. Once completed, verify the deployment in your AKS cluster.
# Verify the deployment
kubectl get all -n default
You should see the NGINX pods running and the LoadBalancer service exposing the application.
The Power of Automation: Azure DevOps and Helm
By leveraging Azure DevOps pipelines, we’ve automated the deployment of a Helm application to Azure AKS. This approach not only saves time but also ensures consistency and reduces the risk of manual errors. The power of Azure DevOps lies in its ability to seamlessly integrate with various tools and services, providing a cohesive and efficient CI/CD pipeline.
The Voyage Ahead
Our journey today highlighted the synergy between Azure DevOps and Helm in managing Kubernetes deployments. From setting up an AKS cluster to automating the deployment with Azure DevOps pipelines, we’ve covered the essential steps to streamline your cloud operations. In a future post, we’ll delve deeper into automating more complex workflows and integrating additional Azure DevOps services.
Stay tuned for more adventures in the world of cloud computing, where we’ll explore the endless possibilities of automation and DevOps.
