
In the ever-evolving digital landscape, efficient data storage is paramount. Microsoft Azure offers a comprehensive suite of storage solutions, each with unique capabilities designed to meet diverse business needs. To harness the full potential of Azure Storage, it’s crucial to understand and implement optimisation techniques. This guide will delve deeper into advanced concepts to help you maximise performance, cost-efficiency, and scalability.
The Importance of Optimising Azure Storage
Optimising Azure Storage is essential for several reasons:
- Enhanced Application Performance: Speedier data retrieval and processing.
- Cost Efficiency: Reduced storage and data transfer costs.
- Improved User Experience: Faster response times for end-users.
Let’s explore advanced strategies for optimising Azure Storage.
1. Selecting the Right Storage Tier
Azure Storage provides various tiers, each suited to different data access patterns:
- Hot Tier: Ideal for frequently accessed data.
- Cool Tier: Suitable for data accessed less frequently, stored for at least 30 days.
- Archive Tier: Best for rarely accessed data, stored for at least 180 days.
Consider a media company managing vast libraries of video content. New releases and trending videos should reside in the Hot tier for quick access. Older, less-viewed content can transition to the Cool tier, while archival footage not needed for months can be stored in the Archive tier.
2. Fine-Tuning Blob Storage and Access Tiers
Azure Blob Storage is optimal for large-scale unstructured data. Key features include:
- Hot Access Tier: For frequently accessed blobs.
- Cool Access Tier: For infrequently accessed blobs.
3. Implementing Azure Blob Storage Lifecycle Management
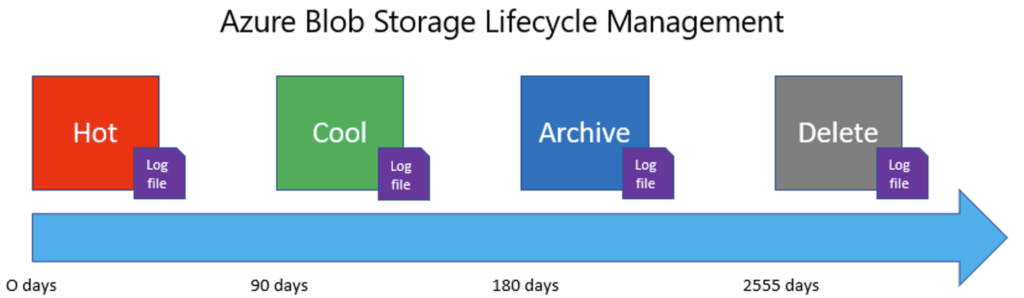
Lifecycle management automates data tier transitions, reducing manual oversight. You can create policies to move blobs to appropriate tiers based on access patterns, ensuring cost-effective storage.
Policy Example:
{
  "rules": [
    {
      "name": "MoveToCoolAfter30Days",
      "enabled": true,
      "definition": {
        "filters": {
          "blobTypes": ["blockBlob"],
          "prefixMatch": ["video-"]
        },
        "actions": {
          "baseBlob": {
            "tierToCool": {
              "daysAfterModificationGreaterThan": 30
            },
            "delete": {
              "daysAfterModificationGreaterThan": 365
            }
          }
        }
      }
    }
  ]
}
This policy moves video files to the Cool tier after 30 days and deletes them after a year.
4. Utilising Premium Storage for High-Performance Needs
Azure Premium Storage offers low latency and high throughput, making it ideal for I/O-intensive applications such as databases and virtual machines. For example, a financial services firm running real-time trading applications can leverage Premium Storage for transaction logs and databases, ensuring minimal latency and high reliability.
5. Optimising for Network Performance
Network performance is crucial for efficient data access and transfer. Key strategies include:
- Azure Content Delivery Network (CDN): Distributes data globally, reducing latency.
- Read-access Geo-redundant Storage (RA-GRS): Provides high availability and better read performance by replicating data to secondary regions.
6. Implementing Caching
Azure offers various caching options like Azure Cache for Redis, which can store frequently accessed data in memory, significantly reducing read times and lowering storage costs. For example, an e-commerce platform can cache popular product images and details using Azure Cache for Redis, ensuring fast access and a seamless shopping experience for users.
7. Monitoring and Adjusting Regularly
Regular monitoring of storage performance is essential. Azure Monitor provides detailed insights into metrics like latency, IOPS, and throughput, enabling proactive management. Advanced Metrics to Monitor:
- Latency: Measure time taken to complete storage operations.
- IOPS (Input/Output Operations Per Second): Track the number of read/write operations.
- Throughput: Assess the amount of data transferred per second.
8. Utilising Advanced Tools and Features
Azure offers several advanced tools and features to further optimise storage performance:
- Azure Storage Explorer: Provides a graphical interface for managing storage accounts, useful for tracking and adjusting storage configurations.
- Azure Blob Indexer: Helps in quickly indexing and searching through large datasets, improving data retrieval speeds.
- Azure Data Lake Storage (ADLS): Combines the power of a high-performance file system with massive scalability, supporting big data analytics.
Optimising Azure Storage involves a combination of strategic planning, regular monitoring, and leveraging advanced tools and features. By selecting the right storage tier, fine-tuning blob storage, implementing lifecycle management, utilising premium storage, optimising network performance, implementing caching, and monitoring regularly, you can ensure your Azure Storage is performing at its peak.
Azure’s diverse storage solutions and optimisation capabilities offer a powerful platform to meet the demands of modern applications and data workloads. Remember, storage optimisation is an ongoing process. Stay vigilant, adapt to changing needs, and continually refine your strategies to maintain optimal performance and cost-efficiency.
Sources:
- Microsoft Azure Documentation: Azure Storage Overview
- Azure Architecture Center: Optimise your storage performance
- Azure Storage Pricing: Azure Storage Pricing
- Azure Monitor: Monitor metrics in Azure Storage
Feel free to tweak the post further or add any specific details that you think would be useful for your audience!