
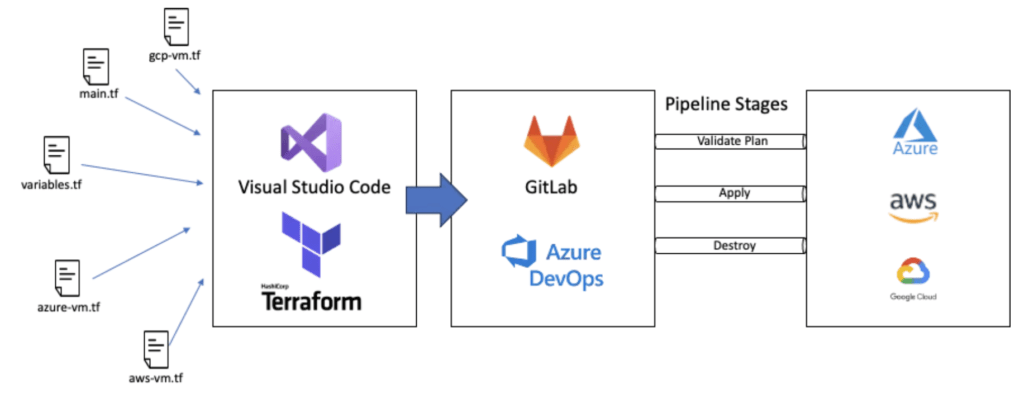
Integrating HashiCorp Terraform with GitLab’s AutoDevOps capabilities provides a powerful solution for automating infrastructure management. By leveraging GitLab CI/CD pipelines and Terraform, you can achieve efficient, consistent, and secure deployments across multiple environments. This blog post will cover the basics of setting up a GitLab AutoDevOps pipeline with Terraform, interpolating variables from GitLab Variables, authenticating the pipeline to Azure Cloud, and practical use cases in CI/CD and DevOps workflows.
Introduction to GitLab AutoDevOps and Terraform
GitLab AutoDevOps simplifies the setup of CI/CD pipelines by automating the process of building, testing, and deploying applications. When combined with Terraform, it allows for seamless infrastructure provisioning and management as part of the deployment process.
Terraform, an Infrastructure as Code (IaC) tool, enables you to define and manage your infrastructure using configuration files. Integrating Terraform into GitLab’s AutoDevOps pipeline ensures that infrastructure changes are version-controlled, repeatable, and automated.
Prerequisites
Before getting started, ensure you have the following:
- GitLab Account: Sign up for GitLab if you don’t have an account.
- Azure Account: Sign up for Azure and set up the necessary resources.
- Terraform Installed: Ensure Terraform is installed on your local machine for initial setup.
- GitLab Runner: Set up a GitLab Runner if you’re not using GitLab’s shared runners.
Setting Up GitLab AutoDevOps Pipeline with Terraform
Step 1: Creating a GitLab Project
Create a New Project: In your GitLab account, create a new project or repository to store your Terraform configuration files.
├── .gitlab-ci.yml
├── main.tf
├── variables.tf
├── outputs.tf
Step 2: Writing Terraform Configuration Files
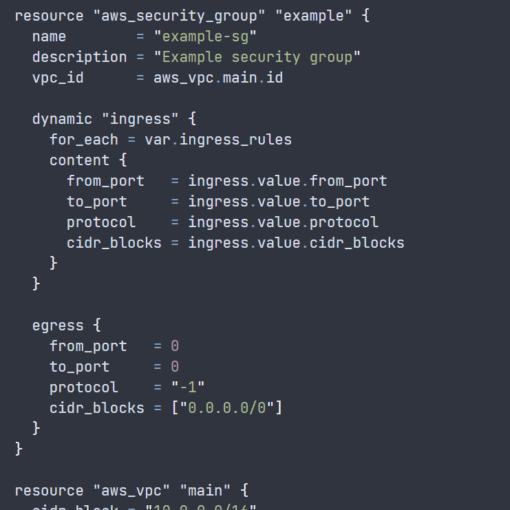
main.tf: Define your Azure resources in main.tf.
provider "azurerm" {
  features {}
}

resource "azurerm_resource_group" "example" {
  name     = "example-resources"
  location = "East US"
}

resource "azurerm_storage_account" "example" {
  name                     = "examplestoracc"
  resource_group_name      = azurerm_resource_group.example.name
  location                 = azurerm_resource_group.example.location
  account_tier             = "Standard"
  account_replication_type = "LRS"
}variables.tf: Define variables for your configuration.
variable "resource_group_name" {
  description = "The name of the resource group"
  type        = string
  default     = "example-resources"
}

variable "location" {
  description = "The Azure region to deploy resources"
  type        = string
  default     = "East US"
}

variable "storage_account_name" {
  description = "The name of the storage account"
  type        = string
  default     = "examplestoracc"
}outputs.tf: Define outputs for your configuration.
output "resource_group_name" {
  description = "The name of the resource group"
  value       = azurerm_resource_group.example.name
}

output "storage_account_name" {
  description = "The name of the storage account"
  value       = azurerm_storage_account.example.name
}
Step 3: Configuring GitLab Variables
Set up environment variables in GitLab for authentication and configuration. Navigate to your project settings, and under CI / CD -> Variables, add the following variables:
ARM_CLIENT_ID: Your Azure Service Principal client ID.ARM_CLIENT_SECRET: Your Azure Service Principal client secret.ARM_SUBSCRIPTION_ID: Your Azure subscription ID.ARM_TENANT_ID: Your Azure tenant ID.ENVIRONMENT: The deployment environment (e.g.,dev,uat,prod).
Step 4: Authenticating the Pipeline to Azure
Update the .gitlab-ci.yml file to authenticate with Azure and run Terraform commands.
.gitlab-ci.yml:
image: hashicorp/terraform:latest

stages:
  - validate
  - plan
  - apply

variables:
  TF_ROOT: ${CI_PROJECT_DIR}/
  ARM_CLIENT_ID: $ARM_CLIENT_ID
  ARM_CLIENT_SECRET: $ARM_CLIENT_SECRET
  ARM_SUBSCRIPTION_ID: $ARM_SUBSCRIPTION_ID
  ARM_TENANT_ID: $ARM_TENANT_ID

before_script:
  - terraform version
  - terraform init

validate:
  stage: validate
  script:
    - terraform validate

.plan_template: &plan_definition
  stage: plan
  script:
    - terraform workspace select ${ENVIRONMENT} || terraform workspace new ${ENVIRONMENT}
    - terraform plan -var "resource_group_name=${RESOURCE_GROUP_NAME}" -var "location=${LOCATION}" -var "storage_account_name=${STORAGE_ACCOUNT_NAME}" -out=tfplan
  artifacts:
    paths:
      - tfplan

apply:dev:
  <<: *plan_definition
  when: manual
  environment:
    name: dev
  variables:
    ENVIRONMENT: dev

apply:uat:
  <<: *plan_definition
  when: manual
  environment:
    name: uat
  variables:
    ENVIRONMENT: uat

apply:prod:
  <<: *plan_definition
  when: manual
  environment:
    name: prod
  variables:
    ENVIRONMENT: prod

apply:
  stage: apply
  script:
    - terraform workspace select ${ENVIRONMENT}
    - terraform apply -auto-approve tfplan
Step 5: Running the Pipeline
Push Changes: Commit and push your changes to the repository.
git add .
git commit -m "Initial commit with Terraform configuration and CI/CD pipeline"
git push origin master
Run Pipeline: Navigate to the CI / CD -> Pipelines section in GitLab and run the pipeline. You will see the validate, plan, and apply stages executing sequentially.
Use Case: Multi-Environment Deployment
Using the setup above, you can manage multi-environment deployments for development, UAT, and production environments. Here’s a typical workflow:
- Development: Developers push changes to the
devbranch, triggering the pipeline to validate and plan the changes. Theapplystep is manual to prevent unintended deployments. - UAT: Once the changes are validated in development, merge the changes to the
uatbranch. The pipeline runs validation and planning, and theapplystep can be manually triggered for user acceptance testing. - Production: After successful UAT, merge changes to the
mainorprodbranch. The pipeline validates, plans, and applies the changes to the production environment.
Integrating GitLab AutoDevOps with HashiCorp Terraform provides a robust framework for managing and automating infrastructure deployments across multiple environments. By leveraging GitLab’s CI/CD capabilities and Terraform’s infrastructure as code principles, you can achieve consistent, efficient, and secure deployments. The example pipeline and configurations provided here are a foundation you can extend and customise to suit your specific needs. Embrace this powerful combination to streamline your DevOps workflows and ensure your infrastructure management is both scalable and reliable. Happy coding and deploying!
